Categories Plant Doctor
Plant Doctor

IN THE GARDEN
For all your gardening questions just ask,
The Plant Doctor!!
Dr. Hy. Drangea, PhD
From Plantsylvania
Merry Christmas!!! An early present from your friends @ Allied Growers ♡ Presented by Dr.Hy.drangea ♡
For a Healthy, Beautiful Christmas!!! Red Hibiscus flowers might just be your cup of Tea!!!
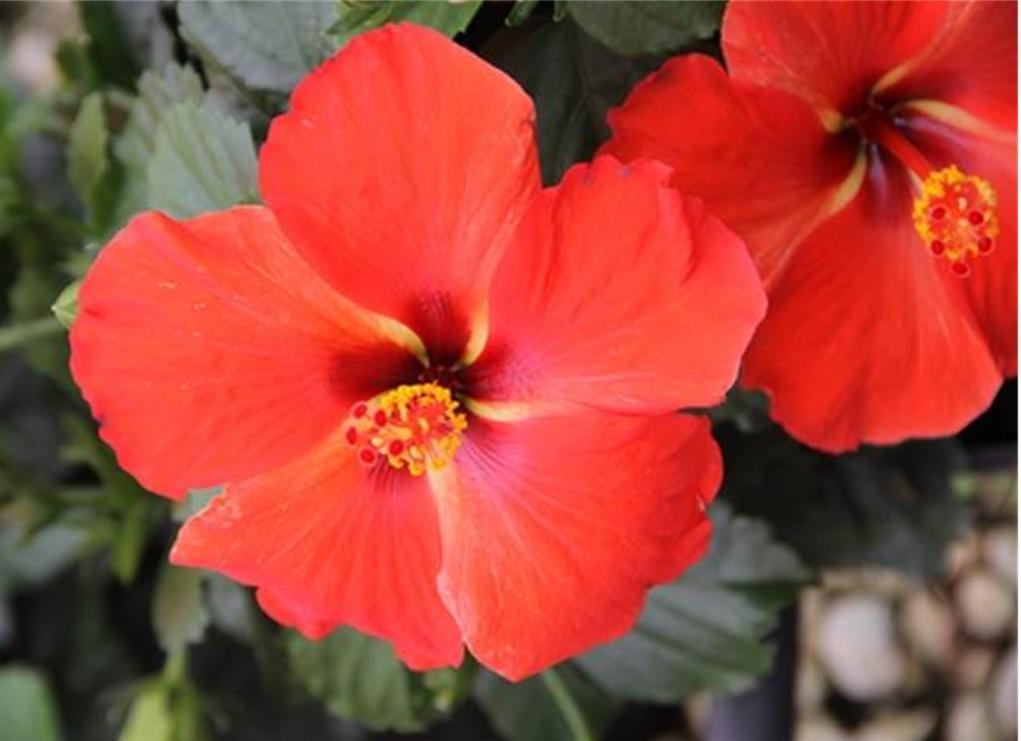
HYPERTENSION? HIBISCUS MAY BE YOUR CUP OF TEA!!
Hibiscus tea is made from the petals of the bright-red flowers of Hibiscus sabdariffa.
Hibiscus tea seems to act as an ACE inhibitor, similar to the blood-pressure drug lisinopril. It was tested head to head with lisinopril in a small study and found to be about equally effective. The same clinical team found that it worked better than hydrochlorothiaside, a standard blood-pressure medication.
Get your cup of Red Hibiscus Tea and get the relief of lower blood pressure!
THE BENEFITS OF PLANTS
House plants are used to brighten up a room and help to create a relaxing atmosphere, but they can also bring real health benefits.Common house plants have found to purify indoor air, removing toxic air emissions like ammonia, formaldehyde, carbon monoxide, benzene, xylene and trichloroethytene. Studies have also shown that houseplants can reduce cold-related illnesses.
A NASA study found that common house plants could improve indoor air quality. They reported that houseplants were able to remove up to 87 percent of air toxins in 24 hours.
A NASA study found that common house plants could improve indoor air quality. They reported that houseplants were able to remove up to 87 percent of air toxins in 24 hours.
CARE & HANDLING OF A ROSE
STEP 1: FEED & HYDRATE THEM
Roses are more than 90 percent water and hydration is critical.
A commercial flower food can extend roses’ vase life up to six days.
...
STEP 2: PROTECT THEM
Prevent ethylene damage by requiring growers to treat roses with either Silver Thiosulfate of 1-MCP sold commercially as EthylBloc or Ethylene Buster. These products prevent the action of ethylene from external sources as well as from the internally produced ethylene.
STEP 3: KEEP THEM COLD
Cold temperatures help roses conserve energy that can later be used for flower opening and extended vase life.
These steps are provided on behalf of Dr. Hy. Drangea and Terril A. Nell, AAF, Ph.D.See More
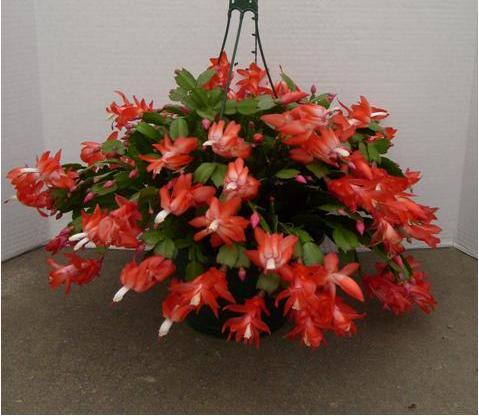
CHRISTMAS CACTUS CARE AND INFORMATION
While the poinsettia remains the most popular of the holiday plants, a healthy Christmas cactus in full bloom is a great gift idea for that special gardener. They are easy to care for and can be grown indoors throughout the year. The flowers range in color from yellow, salmon, pink, fuchsia and white or combinations of those colors.
• Common name ~ Christmas Cactus
• Scientific name ~ Schlumbergera bridesii - ZygoCactus
• Origin ~ A group of epiphytic cacti native to the South American jungles
• Light ~ While the Christmas cactus can adapt to low light, more abundant blooms are produced on plants that have been exposed to high light intensity. Keep your plants in a sunny location indoors. Plants can be moved outdoors in summer, but keep them in a shady or semi-shady location. Too much direct sunlight can burn the leaves. When it's time to bring the plants back inside in the fall, slowly adjust the plants to life indoors by gradually increasing the number of hours they spend indoors each day. If you want to grow it indoors in a south or west window, you should shade the plant with glass curtains. No diffusion of light is needed on the north or east. Many growers move the plants to the broken shade of a porch or patio or plunge the pot in a shady spot in the garden during the summer months. Christmas cactus needs shading from the sun between May and September.• Soil ~ Well-drained soil is a must for Christmas cactus. Use a commercially packaged potting mix for succulent plants or mix your own. The ideal soil for Christmas cactus is composed of equal parts of garden loam, leaf mold and clean coarse sand (not sand from the seashore). Add a quart of wood ashes per bushel of mixture. One-tenth part by bulk of old dry cow manure may be added if garden soil is poor.
• Water ~ The plant is not a true cactus and is not quite as drought tolerant as the name infers. However, it is a succulent plant and can store a reasonable quantity of water in the leaves. Water thoroughly when the top half of the soil in the pot feels dry to the touch. The length of time between watering will vary with the air temperature, amount of light, rate of growth and relative humidity. During the summer, water so that the soil is continually moist. When fall arrives, water the plant only well enough to prevent wilting. During the month of October, give the plant no water. Cautiously resume watering in November, but don't let stems get flabby from over watering. If the atmosphere is dry, place pot on a tray of pebbles. Keep pebbles moist with water in the tray. After plant completes blooming, let it rest by withholding water for six weeks. When new growth appears, re-pot and top-dress with fresh soil. Resume watering to keep soil fairly moist.
• Fertilizing ~ As tender growth appears in the spring;apply a weak solution of liquid houseplant fertilizer at 2 to 3 weeks.
• Temperature ~ Prefers warm temperatures, although evening temperatures of 50 to 55 degrees F can be used to initiate flower bud formation (which normally is responsive to day length). From October on, keep the plant where it is cool at night (60 to 65 F). Keep away from drafts from heat vents, fireplaces or other sources of hot air.
• Propagation ~ Shady conditions or filtered light are necessary for Christmas cactus to thrive. You can force bloom by setting the plant in a cool (60 to 65 degrees F) location, where the light is low but not absent during the day. Do this soon for Christmas bloom. Do not let the soil dry completely, but water infrequently to keep the soil just moist. Watch for signs of buds at the ends of the leaves, and increase humidity and light when they appear. If buds appear too soon, hold them back by reducing the temperature.
The Christmas Cactus is easily propagated by taking short Y-shaped cuttings of the stem tips. A well-tended cactus will reach unmanageable size in time. To root cuttings for new plants, cut back shoots from the tips, cut at the second joint of each tip. Place cuttings in a moist peat and per lite, or peat and sand mixture. Water sparingly at first to prevent rotting of cuttings. After two or three weeks, water as you would any other cutting. When cuttings are rooted, pot them in a very loose mixture of good potting soil.
• Re-potting ~ Plants should be re-potted every two or three years, or whenever pot is filled with roots and the soil appears to be depleted of nutrients. Christmas cactus usually is re-potted in the spring, but a plant which is unhealthy because of the root system can be re-potted at any time of the year.
• Bud Dropping ~ Common causes of bud dropping are over watering, exposure to cold drafts, a position too close to a hot radiator or vent and lack of sufficient potash in the soil. Water plant sparingly and feed a little liquid manure weekly.
• How to get your Christmas Cactus to flower ~ These plants are easy to grow but are sometimes difficult to get to bloom. A medium light intensity and a soil high in organic matter are recommended. Do not allow the plant to dry out, water when the soil surface begins to feel dry. The plant may be kept drier in fall. Any fertilizer may be used according to label directions. Cool temperatures or long nights are required to induce blooming. The plants bloom when given night temperatures near 55 degrees and day temperatures below 65 degrees.
Flowering is related to day length and night time temperatures. The temperature range for flower bud development is between 55 and 60 degrees for a period of six weeks. As long as the temperatures remain in this range they will develop buds regardless of day length. If the temperatures in your home get above that required range, the plant will need 13 hours of uninterrupted darkness each night. One can do this by placing them in a completely dark room, or by covering them for the recommended time, or longer, each night with a dark piece of cloth. Or just keep the plants in total darkness like a closet till buds develop. For holiday blooms this usually means in late September to mid October.
During flower bud formation, stop fertilizing and only water enough to keep the leaves from becoming shriveled. Once buds do form then you can keep the plant in normal light and temperatures. Keep it evenly moist and fertilize every other week with a mild fertilizer solution.The general schedule of the ideal life of a Christmas Cactus
• Jan ~ Flowering.
• Feb to Mar ~ Resting (55 degrees, infrequent watering).
• Apr to May ~ Water thoroughly when potting mix begins to dry out.
• Jun to Aug ~ Place outdoors in a shady spot.
• Sept to Oct ~ Plant prepares to flower. Reduce length daylight hours.Keep on the dry side and cool (55 to 60 degrees F) until flower buds form. Then increase water and temperature.
• Nov to Dec ~ Flowering. Water normally. Temperature no less than 55 degrees F.

MUMS THE WORD
Mums make great garden plants because they are perennials, meaning that they come back for several years or longer and don't have to be replanted each year. Mums are a great addition to the garden, providing color and variety to any landscape. With proper care, you can enjoy the same plants for many seasons.
How to care for your garden mums:
Plant garden mums in the spring in order to give them enough time to become well established before winter. Many mums are sold in the fall at nurseries, and with all their energy going to blooms they won't always have enough time to build up their root system to get through the winter. When planted in August, September and October, they may not do as well over the winter, so planting in spring is best. However, mums can be planted any time before the ground freezes.
-
Water the new mums daily for at least a week after planting, and then several times a week during the heat of the summer.
Mulch around the garden mums to protect them form excessive summer heat and for winter protection of their roots. Natural mulch, such as wood chips or chopped leaves, work best.
Remove the mums dead blooms, allowing the mums to put their energy back into the root system. Remove all blooms but leave the foliage on to help them get through the winter.Prune old growth in late winter to make room for new stems and leaves in the spring.
Miniature roses are true roses, bred to stay small in size. They are extremely hardy and work well in a border or edgers. Plant and treat miniature roses the same as you would full size roses.
Planting Dig a hole the same depth as the pot the rose came in and about a foot wider. Loosen the roots and add organic matter to the soil in the hole. Place plant in the center with the roots spread out. Fill in the hole and gently firm the soil and thoroughly water and apply a layer of mulch.
Feeding Feed when the bush first leafs out. Feed after each heavy flush of bloom. Stop feeding about 6-8 weeks before the first expected frost.

Watering During hot, dry spellsyou will need to water more frequently. Be sure to water deeply, so that the soil is wet. Avoid getting the leaves wet during humid weather, to discourage fungal disease.
Diseases and Pests Keep an eye out for the early signs of insect damage and treat accordingly.
Miniature Roses as House Plants They do quite well in containers, but they need full sun and good humidity. They do best if transplanted outdoors.

POINSETTIA CARE
Caring For Holiday Poinsettia and Getting It To Bloom Again Next Year
When You First Bring Your Poinsettia Home
Light - Place it near a sunny window. South, east or west facing windows are preferable to a north facing window. Poinsettias are tropicals and will appreciate as much direct sunlight as you can provide.
Heat - To keep the poinsettia in bloom as long as possible, maintain a temperature of 65 - 75 degrees F. during the day. Dropping the temperature to about 60 degrees F. at night will not hurt the plant. However, cold drafts or allowing the leaves to touch a cold window ca injure the leaves and cause premature leaf drop. If you've ever see a gangly poinsettia in bloom, with only a couple of sad looking leaves hanging on, it was probably exposed to temperatures that were too cool or extreme shifts in temperature.
Water - Water the plant whenever the surface feels dry to the touch. Water until it drains out the bottom, but don't let the plant sit in water. Wilting is another common cause of leaf drop. A wilted plant can be revived and salvaged, but it will take another season to improve its appearance.
Humidity - Lack of humidity during dry seasons, in particular winter, is an ongoing houseplant problem. If your home tends to be dry and your poinsettia is in direct light, you will find yourself watering frequently, possibly every day.
Poinsettias (Euphorbia pulcherrima) remain one of the most popular holiday flowers. Hybridizers have expanded the range of colors from the familiar red to pastel yellow and vibrant bi-colors. One of the most common questions after Christmas is “How can I care for my poinsettia so that it will bloom again next Christmas?”. While this can be done, it's a very fussy, exacting process and since the plants are not that expensive, you might just choose to start fresh next year.
For those of you who are undaunted, the process for saving your poinsettia and getting it to rebloom begins with the care you give it the first season.
After Christmas Care
January - March: Keep watering the poinsettia whenever the surface is dry.
April: Starting April 1st, gradually decrease water, allowing to get dry between waterings. Be careful the stem does not begin to shrivel. This is a sign the plant is too stressed and is dying. In a week or two, when the plant has acclimated to this drying process, move it to a cool spot like the basement or a heated garage. You want to keep it at about 60 degrees F.
May: In mid-May, cut the stems back to about 4 inches and repot in a slightly larger container, with new potting soil. Water it well. Place the newly potted plant back into the brightest window you have and once again keep it at a temperature of 65 - 75 degrees F. Continue watering whenever the surface of the soil feels dry.
Watch for new growth. Once new growth appears, begin fertilizing every two weeks with a complete fertilizer. Follow fertilizer label recommendations.
June: More the poinsettia outside, pot and all. Keep it in a partially shaded location and maintain your watering and fertilizing schedule.
July: In early July, pinch back each stem by about one inch. This is to encourage a stout, well branched plant. If left unpinched, the poinsettia will grow tall and spindly.
August: By mid-August, the stems should have branched and leafed out. Once again, pinch or cut the new stems, leaving 3-4 leaves on each shoot. Bring the plant back indoors and back into your brightest window. Continue watering and fertilizing.
September: Continue regular watering and fertilizing. Make sure the temperature stays above 65 degrees F.
October: Poinsettias are short-day plants, meaning their bud set is affected by the length of daylight. To re-bloom, poinsettias need about 10 weeks with 12 hours or less of sunlight per day. You will have to artificially create these conditions and it's crucial that you be diligent.
Beginning October 1st, keep your plant in complete darkness from 5 pm to 8 am. Any exposure to light will delay blooming. Use an opaque box or material to block out light. Many people place their plants in a closest, but if light gets in though the cracks or if you open and use the closet, it will affect the bud set.
Move the plant back to the sunny window during the daytime and continue watering and fertilizing.
November: Around the last week of November, you can stop the darkness treatment and allow the plant to remain in the window. You should see flower buds at this point
December - Stop fertilizing about December 15th. Keep watering and treat your plant the way you did when you first brought it home in bloom. If all has gone well, it should be back in bloom and ready to begin the process all over again.

NORFOLK PINE CARE
Watering and misting
Norfolk Island pine trees need moisture and require consistent watering. Water them thoroughly each week during the growing season to keep the soil slightly moist. Don't allow them to dry out, particularly during the summer. During the inactive winter months, let the soil dry out completely and then water lightly.
Never let the tree sit in water. Overwatering causes root rot. The needles turn yellow or brown and fall off easily. If the tree is too dry, the lower branches turn brown and die, and the needles drop off. Once that occurs, growth stops.
Norfolk Island pines also benefit from added humidity. Mist daily with cool water. Maintaining adequate humidity levels is challenging, especially in cold climates. If winter heating dries out indoor air, consider setting the pot in a shallow tray filled with water and pebbles to add humidity. Lack of humidity causes the branch tips to turn brown and needles to drop off.
Lighting and temperature
Place Norfolk Island pines in bright, filtered sunshine indoors to receive indirect natural light. Keep them out of direct, full sun. While they can survive solely with incandescent or fluorescent light, they won't thrive.
Turn the plant regularly to keep it symmetrical, ¼ turn at any given time so as not to shock it.
Even with the sunshine requirements, Norfolk Island pines grow best in day time temperatures of about 65 degrees Fahrenheit. They like slightly cooler temperatures at night. Avoid sudden changes in room temperature, temperature extremes and chilly drafts.
Pruning and pests
As Norfolk Island pines grow upward, the trunk thickens and the branches increase in size. Cutting off the growing tips destroys its naturally symmetrical shape. The only pruning that's suggested is cutting back any brown tips and dead branches. Remember, all growth stops at the point of pruning.
Mealy bugs can harm the pine, so spray it with an insecticide as directed for a few weeks.
Control scale infestations by applying rubbing alcohol or horticultural oil onto affected areas.
Christmas decorating
Norfolk Island pines require special attention when decorating them at Christmas. Use small, light weight ornaments, and keep them on the tree for only a few days. Cool burning bulbs prevent permanent damage to the branches or needles as can be caused with hot bulbs. Maintain moisture, because of the added heat.

AMARYLLIS CARE
Here's an easy step-by-step plan to get your amaryllis to bloom again:
1. Keep it cool through the holidays.
Enjoy your amaryllis for the maximum time possible by placing it in a location with diffuse light and cool indoor temperatures in the 60°F range. Keep it barely moist. When you water, be careful not to get the portion of the bulb that sticks above the soil wet. If you have a large bulb, you may get two or three flowering stalks that bloom over a period of several weeks.
2. Cut the flower stalks.
When the last flower has faded on each of the flower stalks, cut the flower stalk near the top of the bulb. Be careful not to injure the leaves or any emerging flower stalks. Don't be alarmed if a large amount of sap runs out of the hollow flower stalk when you cut it. This is normal if the plant has been well watered.
3. Increase light, water, and fertilizer.
It's now late winter, and your amaryllis is now in its growth phase. Your main objective is to encourage leaf production that will help the bulb bulk up for next year's flowers. It's hard to give your amaryllis too much sunlight at this time of the year. Move it to the sunniest location that you can manage. A sunroom or greenhouse space is best, but a south-facing window will work until spring comes. Fertilize it monthly with a liquid fertilizer, and never allow the soil to dry out completely.
4. Move it outdoors in spring.
As soon as the weather settles and all threat of frost is gone, move your amaryllis outdoors. Don't be alarmed if many of the leaves wither and die in the adjustment period. Wind and exposure to more sunlight may cause some of the older leaves to die; new ones will grow. Choose a sunny area where you can water the plants daily. A deck or patio works fine, and the glossy strap-shaped leaves are a good textural foil for many other plants. Fertilize the plants every two weeks with a liquid fertilizer or apply a slow release fertilizer.
5. Decide when you'd like your amaryllis to bloom.
If you want flowers for the holidays, you'll need to begin its dormant period by mid August. Withhold water, and move the pots to a location where they can be kept around 55°F. Most people don't have a space that they can keep this cool at the height of summer, so you might have to let the seasons determine bloom time for you. You can leave your amaryllis outdoors well into autumn. If you do, stop fertilizing it in late September and bring it indoors before the end of October or earlier if a heavy frost is forecast. You can bring it indoors in the pot or remove the bulb from the pot and wash the soil off the roots if you like at this time.
6. Keep it in cool storage until the bulbs signal they are ready to go.
Amaryllis usually lose all or most of their leaves during their dormant period, although it is not necessary for all the leaves to wither for the bulb to reach complete dormancy. Keep the bulb on the dry side. Check the bulb every week; after eight to ten weeks of cool storage, you should notice the tip of the new flower stalk emerging from the bulb. If you shift the bulb to a warm spot (70-80°F) for three weeks, you will encourage leaves to emerge at the same time the flower stalk is developing, but a warm treatment is not needed for floral development. You can repot the bulb in fresh soil at this point. Be careful not to bury the bulb too deeply. At least one third of the bulb should be visible above the soil surface. Don't plant the bulb in a pot that is any more than two times the diameter of the bulb. When you repot it, you may notice smaller side bulbs that can be broken away from the main bulb. These can also be potted and grown on in a sunny spot. They will not bloom this year, but may bloom after two or three years of growth.
7. Start it warm and water tentatively.
Water your amaryllis thoroughly right after you repot it, and allow the soil surface to dry a bit before watering it again. Place it in a warm spot to stimulate root growth. A sunny spot is best. If you try to rebloom your amaryllis in dim light conditions, the flower stalk will grow long and your amaryllis will be more prone to breakage or tipping. Wait until the first flower has opened to move the plant to a location with subdued light and cool temperatures to preserve the flower as long as possible.
8. Repeat.
You can keep your amaryllis indefinitely, and if you can provide the right conditions for growth and dormancy, your bulb will get larger and multiply itself over the years. Large bulbs may produce as many as three flower stalks and some bulbs may bloom during the summer as well as during the winter, depending on temperature and other growing condition